


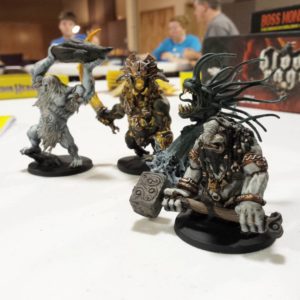
One of my obsessions is painting miniature figures, vehicles, and terrain for tabletop gaming. I started painting probably the way many kids do. I painted model cars, so, when I discovered miniature gaming, I was already decent hand at painting. I was 16 years old when I started painting Warhammer 40k. It’s an expensive game to get into, so I had split a starter set with a friend. But since I was the only one with enough room to paint, I ended up painting both our armies. I made a lot of mistakes and spent a lot of the hard earned money over a hot grill flipping burgers that summer. I had to be careful to never waste money on paint or supplies. I wanted a lot more miniatures, and they aren’t cheap. In time, I developed a set of skills and an understanding of paint products that helped me get a decent, table-ready army at a low cost.
 With a growing number of game sets coming out with miniatures, we at InnRoads get a lot of questions about how to paint figures and help maximize their gaming investment. I came up with this guide to help answer some of those questions. I’ll cover some tips on selecting supplies and basic painting to get your models table ready. I’ll try to explain any terminology along the way, so don’t worry if you’re new to this part of the hobby. For instance, when I say something is Table ready, that means having a miniature painted well enough for game play rather than for display. Likewise, display ready means miniatures are painted just for display purposes or for painting contests.
Miniatures can come in different materials the oldest modern models were lead, so be careful if you get anything made before the 1990s. After lead came pewter, a soft white metal. There are a few companies that still make pewter figures, as it’s easy to work with especially for smaller models. However, most companies don’t use this anymore so I will not be covering them for the purposes of this guide.
Most games now use plastics or resins, so that is what we’re going to focus on here. There are different types of plastics. The harder the plastic the more detailed the miniature can be. Boardgame plastics tend to be softer, so most miniatures will not be what I would consider high detail. The good news there is that you don’t need to try to paint a show-ready miniature to start. That will come later when you decide if you want to keep this as a hobby!
Part 1: Paint selection
Before you can paint your miniature it needs to be primed. Without primer, your paint would just bead up on the miniature and not cover the desired area. Priming your minis changes the surface so that paint will adhere to it better. Some will say you can just get white spray paint, but I don’t think that works nearly as well. There are primers you can get at paint and hobby shops that are specifically formulated for this and provide better results. There are options for primers, but model primer is best if you can get it. It’s thinner than normal primer, so it won’t fill in all those small gaps.
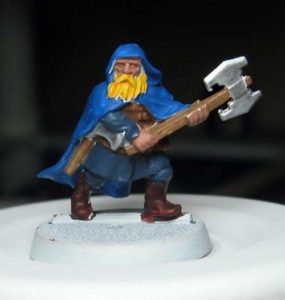
The color of your primer is also important. I would start with using a gray or dark brown. As you advance further along in the hobby, you’ll start to collect a number of primers so that you can experiment. At that point you’ll be able to better match your primer to your base color – the color of the majority of the figure. This will help you paint figures faster. Example: if you are painting a barbarian warrior your base color would most likely be a flesh tone.
Everybody has their own preferences when it comes to buying and using certain paints, but here are a few suggestions:
- Craft Store paints
These are usually labeled as Apple Barrel, Folk Art, and more. They are fairly cheap. You get about 60ml of paint for a dollar or less if you catch a sale. I used nothing but these paints even up till a few months ago. They work, but they are thick and go bad quickly. - Reaper –
This is pretty much the only American company for model painting. They have a great line of colors and miniatures. They have a great starter set with all the basics to get started painting, including a brush, three minis and a how to guide. Reaper also offers spray and brush on primers. Their website has a useful color matching application as well. - Vallejo Model Colors –
In my opinion, these guys are one of the largest and best paint companies out there. They have beautiful colors, but they do cost more. They offer a large range of colors, just one type of brush on primer, and one airbrush ready primer if you choose to go that route. - Citadel –
Most of their colors are designed around their games. They don’t come in dropper bottles, but come in pots that have a chance to dry out faster. A lot of people give citadel a hard time, but they do have a good line of washes. The Nuln Oil wash in flat and gloss is a good one. Citadel used to carry a primer line but have discontinued it, they have formulated their base colors to adhere to their plastic. - Army Painter –
This is the brand I’ve started to use because they believe in getting the miniatures painted in one coat. They also work great out of an airbrush. They have a basic paint set that comes with paint, 1 brush, and 1 wash. Army painter does have a spray primer line that is amazing they have all the matching base colors you will ever need.
Part 2 Prepping
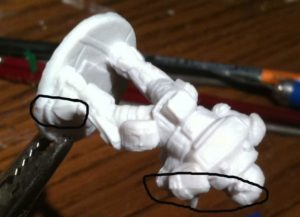 Remove flashing –
Flashing is the line that appears when the mold is created at the point where the two halves of the molds meet. I usually remove this with a razor blade, scraping down the lines a couple of times and it removes it. It’s important that you do not cut it off. Scrape it off. When you get further along and more skilled you might try to remove them with some fine grade files as well.
- Assemble your models –
Smaller models may come as one solid piece, but larger and/or more detailed models may require some assembly. You’ll want to have these assembled before you ever look at painting them.
- Wash your models–
This may sound weird, but you need to wash your models. Because plastic is made from oil, there is a fine, oily residue on the mini. You can’t tell by eye, but it’s there, and it will cause issues with paint. Molds are also treated with chemicals as well, so the plastic doesn’t stick to it when making figures. Get some Dawn, or other grease fighting dish detergent, warm water, and wash them.
- Straighten out bent/warped pieces (weapons/arms/etc)–
Plastic minis will occasionally have parts that get bent in packaging. To fix this, you can boil some water and dip the piece in it for two or three seconds. This will soften the plastic and allow you to gently move the parts back into the intended shape/position. Once shaped, put it into some cold water to set it, retaining the new shape/position.
Part 3 – Brush Selection
Brushes are probably the most important item you need to buy. I started out using brushes designed for model cars meant for applying enamel. I’ll save you the hassle of learning from my mistake. Those brushes don’t work very well for acrylic paints. You’ll need 3 brushes to start with, a round 00 brush, a 0 brush, and 1 flat brush. The 0 is bigger than the 00 and it will be your workhorse. The 00 will be for those smaller details that the 00 is too big for, and the flat brush will be for a technique called dry brushing. These brushes should be labeled accordingly, but you can always ask someone at your local hobby shop if you need help.
Personally, I would recommend Army Painter “Hobby” brushes to start out with. They are cheap compared to their “Wargamer” Brushes, but still get the job done well. If this is the way you choose to go, the three brushes you will want to start with are:
Hobby: Precise Detail
Hobby: Basecoating
Hobby: Drybrush
Part 4 – Painting your miniature
- Prime your minis–
Remember, when priming, to shake the can and make sure it is at room temp. Keep the can about 12-14 inches away and spray in short bursts. You don’t want primer pooling up on the miniature. Do multiple coats if needed but do them thinly. Keep moving as you spray. Don’t stay in one position or you might experience pooling. That’s when paint collects in corners, causing the paint to look sloppy and crack when it dries.
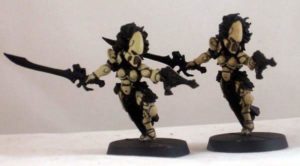
 Blocking your minis-
Blocking is where you paint sections of the miniature in its appropriate, base color. Some examples include painting bare arms in whatever color skin the figure has, armor in gun metal, etc. This stage can be little messy once you get all your colors in you can go back and clean up your lines.

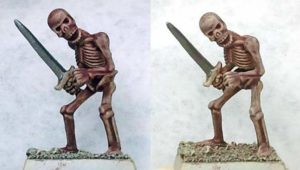
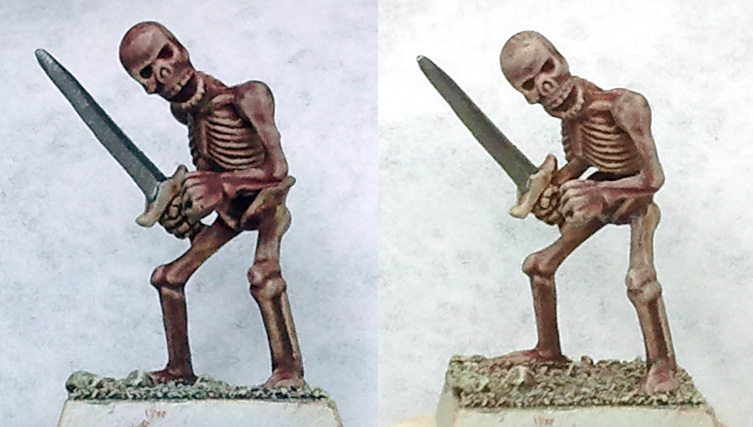
- Apply a Wash-
Washes are more of an advanced step, but they really make a figure pop. They add shading to the mini and bring focus to all those details. Like paints, there are multiple types of washes (often called inks when you see them on the shelves). Once your miniature is blocked the way you want, apply your wash evenly across the mini. You’ll need to watch out here, as they have a tendency to settle. If you see that starting to happen, you can get the excess up with a brush.
I use three methods for washes…
–Selective washing – this is when you apply your wash/inks with a brush. This allows you to change your wash color based on what you want to see in different parts of the mini. Say your miniature has blue jeans on and a brown shirt, you can wash the jeans in a darker blue wash and the shirt in a dark brown wash.
–Quickshading – Quickshading is where you take your mini in a pair of pliers and dip them – wiping away the excess and then let it dry. The problem here is the cost. The cheapest I have seen is often around $30 for one can. If that isn’t something you’re worried about – here’s a video demonstrating the technique that I use.
–Magic wash – this is a homemade wash that works pretty well. Make a mixture that is 80% pledge with future acrylic floor polish, 20% water. Mix it with a few drops of any colored paint to get the effect you’re looking for. Just remember, do not apply to much or it will not harden and you miniatures will remain sticky.
- Dry brushing-
 The wash you applied will darken your miniature a bit, but to really make those details pop, you need to highlight certain areas. You can do this by using a technique called dry brushing. Dry brushing is when you put just a little paint on your brush and get out all of the excess on a paper towel so there barely any still on the brush. Then take your barely filled brush and go over the parts that you want to highlight. This is what your flat brush is for. Don’t use the tip. Use the flat side instead. you will then rake it over the points that stand out on the miniature. This will add more depth to your figure.
- Flock your mini–
The base of your model can be painted any color you wish, but you may also want to flock it. Flock is a material that comes in different colors and textures to look like grass, sand, snow, etc. To apply it, all you just need some Elmer’s glue all on the base with an old brush and sprinkle it on. Then you just let it dry. I make my own flock, and you can look for tips on how to do that in future guides.
- Clear coating your mini–
Clear coating will protect your paint job and make everything look “natural.” You’ll need to use a matte clear coat, which are readily available. I use one from Krylon that works great. Spray it on just like you did your primer. Shake the can, make sure it is at room temp, and use short bursts. Allow it to dry in between coats.
Part 5 – Brush Maintenance
You’ll spend good money on a brush, so I want to give you some tips to help you keep it in good condition. You’ve probably been taught since kindergarten to rake your brushes on the bottom of the cup when you’re cleaning them. Don’t do this! You want to make sure you have enough water in there so you never have to touch the bottom. You’ll also want to make sure you don’t let paint dry in your brush. This includes any remaining paint around the feral (The metal part).
If you notice your tip is splitting and the hairs are going everywhere. Don’t lose heart. You can fix this.You’ll just need to go through the following steps:
- Boil some water.
- Take the water off the boil and put your brushes in it.
- Let them soak for about 2 minutes.
- Pull them out and reshape them by hand.
- Lay them on their side to completely cool down and dry.
Never “Dry” your brush on a paper towel or any other surface. To get rid of any water that’s still in the brush, make a back and forth whipping action. This will both knock out the excess and straighten up the tip of the brush.
Never put your brush in a cup or tip them up to dry in any way. You’ll want them to dry on their side. Once they’re dry you can put them in your storage cup, but don’t do it while they’re still wet. Gravity will affect the bristles if you put them in a cup to dry.
If you follow these steps, you should be able to greatly extend the life of your brushes. The most I’ve ever paid for a brush is 11.00 dollars for a 000 fine detail brush. I bought it about 13-14 years ago. I still use it, the bristles and tip are great even though the paint on the brush itself is wearing out.
If you read this guide and want to watch some helpful videos, you can watch this video that will teach you the basics. If you are comfortable with the basics – you can check out these videos for some more advanced tips that even challenge me to be a better painter
If you have any questions, feel free to comment here or find me in the Tavern. I’ll be happy to help any way I can.